Tuesday, March 31, 2015

From the Kitchen - The Empty Nest

Black Bottom Peanut Butter Cheesecakes

It doesn't get much better than this. Chocolate, peanut butter, cheesecake. I mean, who can resist?
This is a simple recipe, and makes just 6 cakes, but it can easily be increased.

I start with making crumbs from a cinnamon graham cracker, using a gizmo.

Mix in some melted butter, pat the crumbs into the cups. I use my gegaws, aka: silicone muffin cups, which makes clean up simple. You'll see that later on.

Now for the filling. I mix it all together,

until it gets nice and fluffy.

The next step is to sprinkle the chocolate chips onto the crumbs, and slide the pan in the preheated oven.

Then I spread the melted chocolate very carefully so that I don't disturb the crumbs.

Fill the cups,

lick the beaters. I wouldn't dream of wasting this tasty concoction by rinsing it down the drain. A cook always tastes the food as she prepares it.

When the cakes are baked, they puff up, but deflate quickly once they are out of the oven. Trust me, they were sticking way above the top, but by the time I got the camera and snapped the picture, they were already settling. Where is that photographer when I need one?

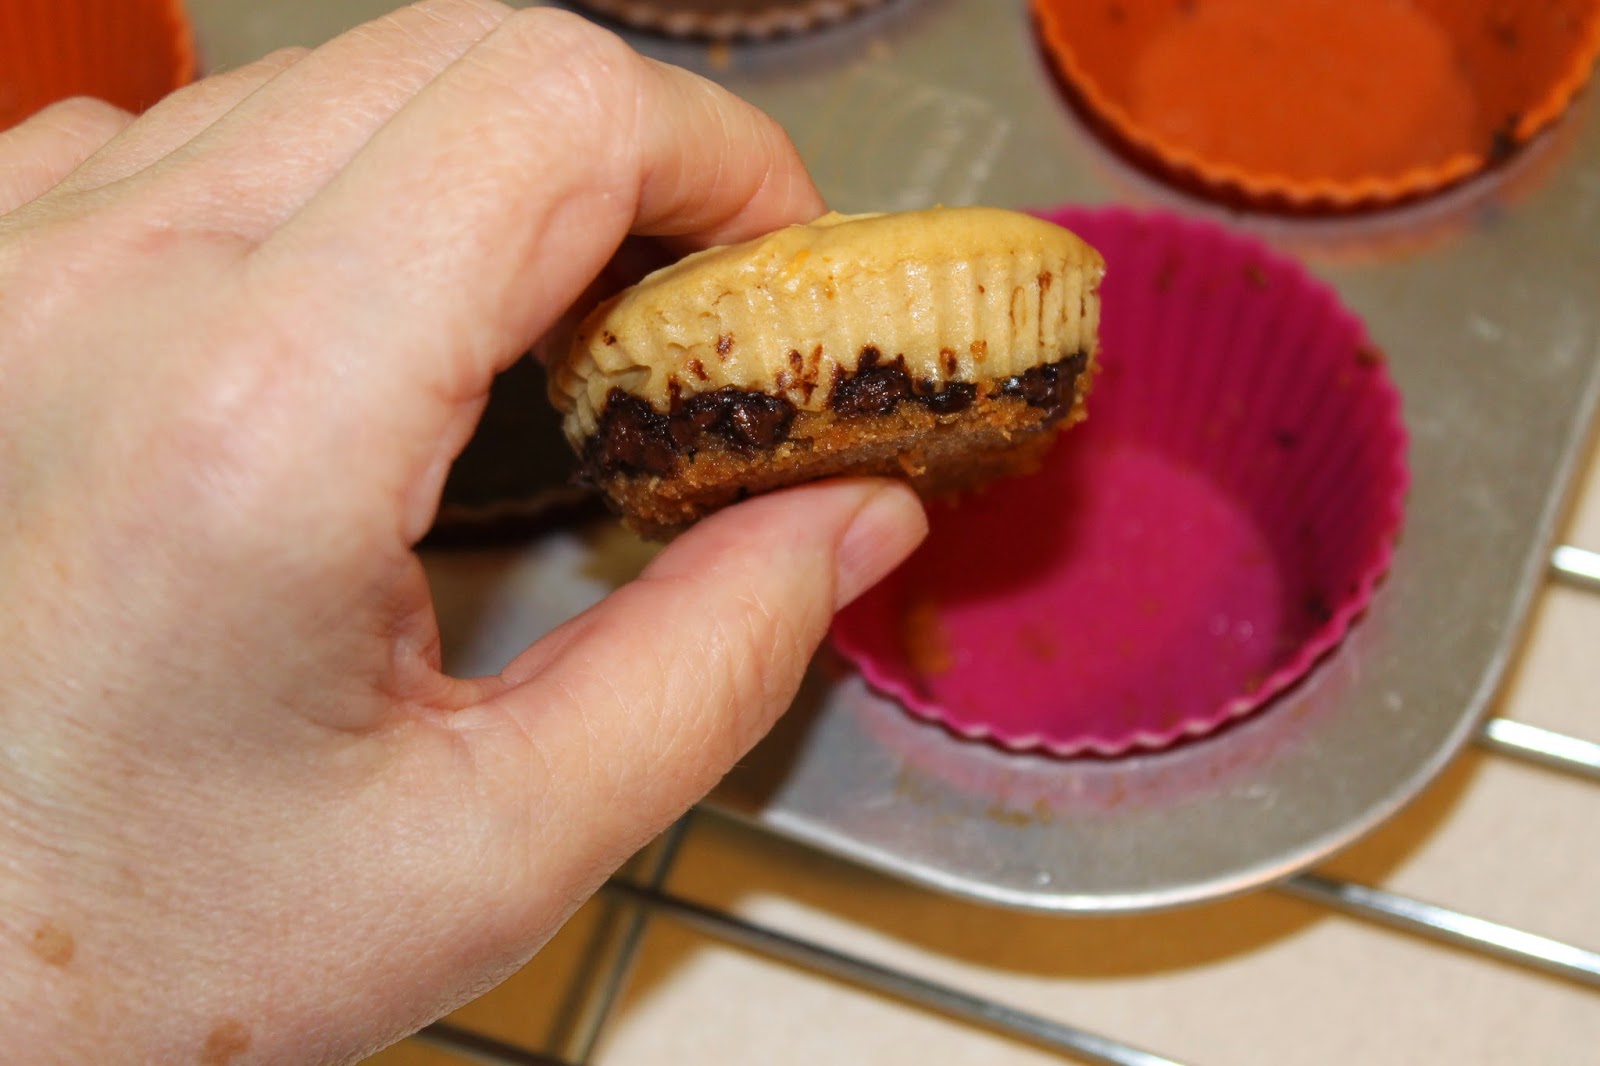
When they are cooled, I gently lift each one out of their pretty cup. See, not much to wash up. These silicone cups are way easier to rinse than trying to clean out the pan. Paper liners will work just as well.
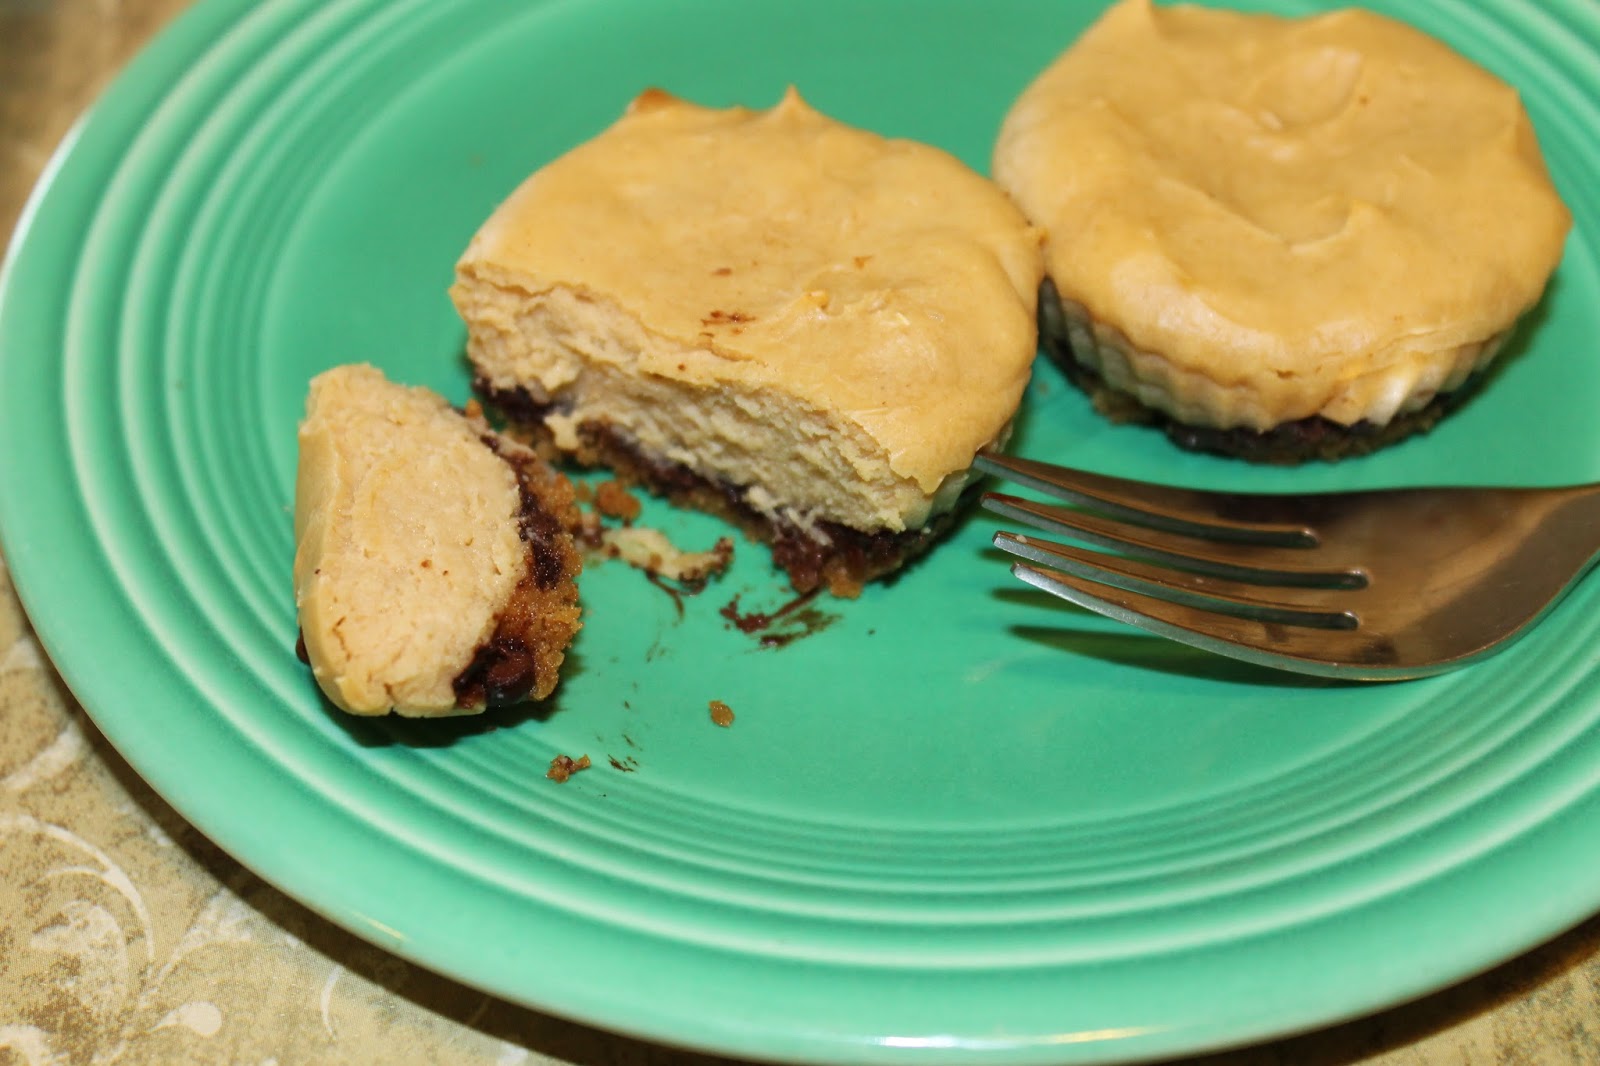
Bite 1,

Bite 3,

the last bite.

Were they ever good.
The recipe follows, and can be found in my Empty Nest Cookbook, available on amazon.com.

Black Bottom Peanut Butter Cheesecakes
1/2 C cinnamon graham cracker crumbs (about 1-1/2 long crackers)
2 Tbsp melted butter or margarine
3 Tbsp mini semi-sweet chocolate baking chips
4 oz. plain fat-free cream cheese spread
3 Tbsp liquid egg substitute
1 Tbsp brown sugar
1 Tbsp fat-free sour cream
2 Tbsp reduced fat peanut butter
 1/2 Tsp vanilla


Preheat oven to 350°. Line 6 cup muffin pan with silicone or paper liners. Mix graham cracker crumbs and melted butter or margarine. Divide into muffin cups and press gently. Sprinkle 1 Tsp mini chocolate baking chips in each cup. In mixing bowl, beat remaining ingredients until combined and smooth. Place pan with crumbs and chocolate chips in oven for 1-3 minutes, until chocolate is melted. Carefully spread melted chocolate with back of spoon. Divide cream cheese mixture into muffin cups. Bake 15-18 minutes, until set and top starts to crack. 6 servings


Saturday, March 28, 2015

From the Kitchen - Outside the Nest

Pizza Waffles

It's gizmo time again. Today's lesson: Pizza crust waffles.

For this recipe, I used dried tomato flakes, and I re-hydrate them in water. I don't use chopped fresh, because they won't be cooked properly, due to the fact that the batter spends so little time cooking in the gizmo.

Measure out the milk and oil, and beat the eggs.
I forgot to photograph the eggs, but everybody knows what a beaten egg looks like anyway. I use real eggs,  not liquid egg product for this recipe.

Ok, now, dry ingredients.

Semolina flour. It looks like corn meal, it feels like corn meal. It's not corn meal.

I combine all the dry ingredients,

and then stir in the wet. Um, there's shredded Parmesan in here. So ok, I forgot to take a picture of that as well. I was really watching what I was doing. I need a photographer standing at my side taking the pictures for me, asking me what on earth it is that I'm trying to concoct.

Now the gizmo. I used this one several weeks ago when I shared my Brownie waffle recipe. Some may be wondering if I ever make plain waffles.
Nope. I can buy them in the store.

After very carefully placing the batter on the waffle maker, and baking them, mine look like this.
Ok, I got better as I went along. You'll see that in upcoming photos. No, really. I did get better.

When I got to the end, they looked like this. I was trying to make waffle bites and waffle sticks. The batter obviously didn't stay where I put it.


Now, let us commence to begin making pizzas. These are great, cuz if you have a bunch of picky people, who don't all like the same thing, they just each make their own. See, aren't these great? And note, there's only one small corner missing from this waffle.
I start with pizza sauce,

cheddar,

lotsa mozza,

turkey pepperoni. Perfect little individual pizzas.

In the oven they go. Oh boy, I can smell them.
I can't wait to burn my mouth on the hot cheese.

And there you got it. Pizza waffles. Any kind of topping can be used. I prefer the plain stuff for these. Any way you fix them, one bite at a time,
are they ever good. I bet Grandpa B never had waffles, especially pizza waffles.
Oh, and, leftover waffles freeze well. Just let them thaw a bit, create the pizza of your choice, and bake them.

One final note, remember to spray the pan that you bake the pizzas on, or you'll have the problems that I had. This stuff sticks like gorilla glue.
Happy Saturday.
Pizza Waffles

2 Tbsp dried tomato flakes
3 Tbsp water
1-1/4 C whole wheat flour
3/4 C semolina flour
1 Tbsp baking powder
1-1/2 Tsp granulated sugar
1 Tsp dried Italian seasoning
1/2 Tsp salt
1/2 C shredded Parmesan
2 Eggs
1-3/4 C milk
1/4 C olive or vegetable oil

Preheat oven to 425°. Spray baking sheet with cooking spray, set aside. Combine tomato flakes and water in glass measure, heat in microwave 45 seconds. Let cool, drain excess juice, set tomatoes aside. In large mixing bowl, combine whole wheat flour, semolina flour, baking powder, sugar, Italian seasoning, salt and cheese, whisk together. In separate bowl, whisk eggs until light and fluffy, add milk and oil. Make a well in the center of the flour mixture and pour in wet ingredients. Stir just until combined. Do not overmix, or waffles will be tough. Preheat electric waffle maker and prepare according to manufacturer’s directions. Add 1/4 C batter to each side(check appliance instructions for other amounts if 1/4 C is too much or not enough). Cook until browned, remove and place on prepared pan while baking remaining batter. Top each waffle with favorite toppings, bake in preheated oven until cheese begins to brown and is melted. Makes 10-12 waffles.


Tuesday, March 24, 2015

From the Kitchen - The Empty Nest

Good For You Chocolate Chippers

Ok, so technically the season is spring, but it's just not warm enough to hang out outside, or do outside things, or find anything actually growing yet.
Which is why I'm sharing another recipe today, instead of doing something like, 'Out and About', or 'Spring has Sprung'.

This is a recipe from my Empty Nest Cookbook.
Once in awhile I have to actually bake something that is good for me, and tastes great as well.

I start by making my own brown sugar, ie: granulated sugar and molasses.

Ok, here we go. Oil, granulated sugar, brown sugar, vanilla, liquid egg product. I use either canola oil or vegetable oil, or whatever I happen to have on hand, except the garlic olive oil. That wouldn't be so good.

Next the baking soda, salt, and flax seed meal.
I was amazed at how pillowy they got when I used baking soda from a fresh box. I didn't dare look at the date on the old box.

Then the flours,

chocolate chips(I use the minis-more chips per cookie) and the chopped almonds.

I scoop the dough with my large cookie scoop, and press the cookies flat with my fingers.

Yes, these are nice and big. I like to leave them sit overnight. I think the flavors come together better.
Any way you eat them, are they ever good.

Good for Your Chocolate Chippers
1/4 C canola oil
1/4 C granulated sugar
1/4 C brown sugar
1/4 C liquid egg substitute or 1 egg
1/2 Tsp vanilla
1/2 Tsp salt
1/2 Tsp baking soda
1/2 C all-purpose flour
1/2 C whole wheat flour
2 Tbsp flax seed meal
1/2 C chocolate baking chips
2 Tbsp chopped almonds


Preheat oven to 375°. Line baking sheet with parchment paper. Mix oil, sugars, egg substitute and vanilla. In separate bowl, whisk together salt, baking soda, flours and flax seed meal. Stir into sugar mixture, mix well. Add chocolate chips and almonds. Drop dough by tablespoons onto cookie sheet, flatten slightly. Bake 8-9 minutes, until lightly browned. Cool on racks. 12-15 large cookies

Saturday, March 21, 2015

From the Kitchen - Outside the Nest

Salmon Spread

I'm sharing one of my favorite spreads today.
This can be made with salmon, tuna, shrimp, crab; the sky's the limit.

Start with plain low fat cream cheese spread and add a squiggle of fat free mayonnaise.

Lemon juice

Dill weed

Onion and garlic powder.

And, the star of the show, salmon.

Mix it all together,

and serve it up. I made my Parmesan Pesto loaf, but French bread, or other kinds can be used.
This is tasty as a sandwich spread as well.

And, it tastes great on your favorite crackers.
All in all, is it ever good.
Happy Saturday

Salmon Spread

1 (5 oz) can skinless, boneless salmon
3 oz. reduced fat cream cheese spread
1 Tbsp. fat free mayonnaise
1 Tbsp lemon juice
1 Tsp dill weed
1/2 Tsp onion powder
1/2 Tsp garlic powder


Drain juice from salmon. Mix cream cheese spread, mayonnaise, lemon juice, onion powder and garlic powder together. Fold in salmon. Chill several hours or overnight to allow flavors to blend. Serve on sliced French bread or crackers.
Note: can use tuna, chopped shrimp, or flaked crab in place of salmon

Tuesday, March 17, 2015

Think Spring

Think Spring

I came across this photo recently, and it made me think of spring. Which starts in a couple of days.
Somebody forgot to tell the weatherman that.
Last weekend, 60 degrees, next weekend 40?
What's wrong with that picture?
So, I continually gaze upon this pretty picture, and I pretend that spring really is going to happen. Soon.

Ok, this is just a teaser.
This picture is actually the new cover of book 5 of my Rivers Run Cottage Series.
Watch for the big announcement in the coming weeks, an excerpt from the book, and the addition to the every growing line of images at the right.
I promise you, it's another good one.

Saturday, March 14, 2015

From the Kitchen - Outside the Nest

Lemon Cheesecake Dessert

I have a couple of vague memories of desserts that my Mom made. One was some type of cheesecake dessert made with cottage cheese.
Another was some kind of lemon dessert. She made these a long, long, time ago, in a far away land: my childhood.
No, really, she did make these desserts, but I asked about the recipes years ago, and she couldn't remember them.
So I said to myself, self, let's come up with our own lemon cheesecake dessert. And then this recipe was born.

Start with the graham crackers. 5 long ones, crushed into crumbs. I use my handy-dandy gizmo, the small chopper. Works great.

Add the butter,

mix and pat in the pan. Refrigerate for a few minutes while you make the filling.

Start with the cream cheese spread and powdered sugar. Please don't use Chive and Onion, or some other such flavor. It kinda ruins the recipe.

This gets beaten, using another gizmo called a hand mixer, until it's light and fluffy.

Then add the milk, a little at a time, and keep using the gizmo to beat it. Do this until all the milk is mixed in.

Add the lemon pudding mix,

and beat 2 minutes more.

Thick, rich, creamy, lucious, lucious, lucious.
And, I get to lick the beaters. I love cooking.

Spread it on the crust, and chill another hour or two.

There you have it.
You know the score: Is it ever good.
Happy Saturday

Lemon Cheesecake Dessert

5 long graham crackers
1/4 C butter, melted
1 (8 oz.) container light plain cream cheese spread
1/4 C powdered sugar
1-1/2 C milk
1 (1 oz.) box sugar-free lemon instant pudding (2 cup serving size)

Crust graham crackers, place in 8 inch square pan. Pour melted butter over top and mix, press onto bottom of pan. Place pan in refrigerator while preparing the filling.


Combine cream cheese and powdered sugar and beat with electric mixer until light and fluffy. Add milk in small amounts and continue to beat after each addition until mixed. Add pudding mix and beat 2 minutes, or until thick. Spoon onto crust and spread out. Refrigerate 1-2 hours before serving. 9 servings